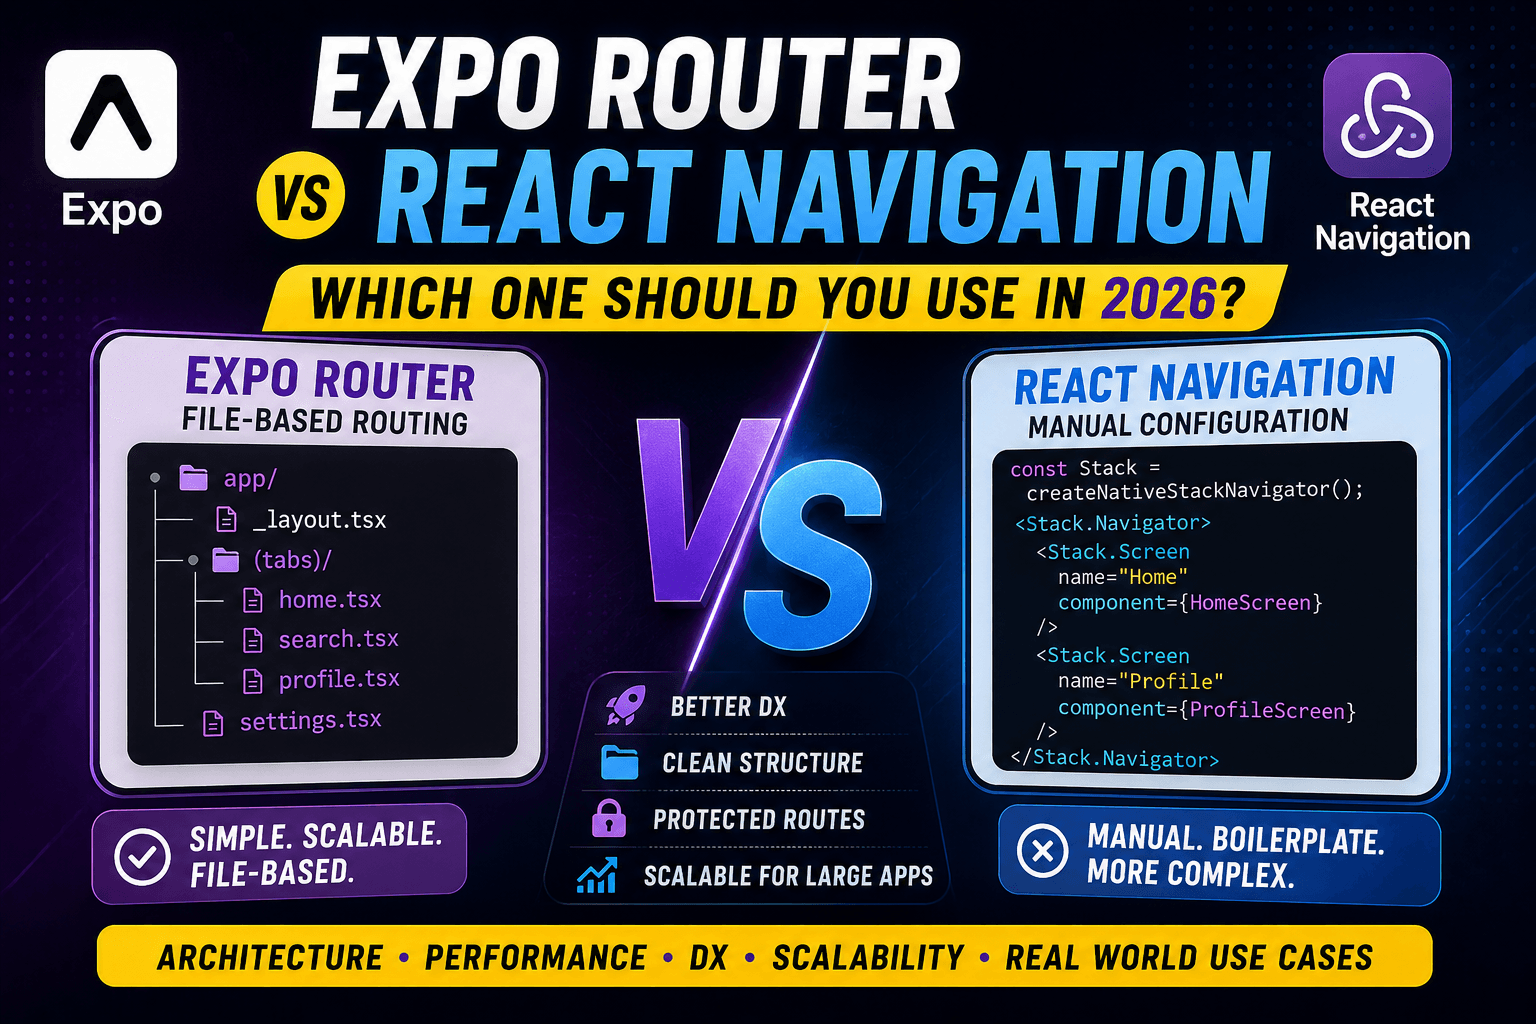
Expo Router vs React Navigation — Which One Should You Use in 2026?
When developers start learning React Native, one of the first confusing topics they face is navigation.
How do you move between screens?
How do you handle authentication?
How do you manage tabs, stacks, nested routes, and deep links?
And honestly, this is where many beginners start getting overwhelmed.
For years, React Navigation was the standard solution for routing in React Native apps. Almost every app used it.
But recently, Expo Router became very popular because it introduced a simpler and more scalable way to manage navigation.
Now the big question is:
Should you use React Navigation or Expo Router in 2026?
The answer is not simply “this one is better.”
Both solve different problems.
And the real goal is understanding how navigation architecture works in production apps.
In this article, we will compare both approaches in very simple language.
What Routing Means in Mobile Applications
Routing simply means:
Moving between screens while maintaining app state.
For example:
- Going from Login → Home
- Opening a Profile screen
- Moving inside nested tabs
- Opening a Chat screen
- Handling back navigation
Without routing, mobile apps would just be one giant screen.
Navigation systems help organize the app properly.
Why Navigation Is Important in React Native Apps
Navigation is not just about moving between screens.
In production apps, navigation controls:
- App structure
- Authentication flow
- Deep linking
- Shared layouts
- Screen history
- State persistence
- User experience
Bad navigation architecture creates huge problems later.
Especially when apps become large.
Apps like Instagram, Uber, WhatsApp, and Netflix have extremely complex navigation systems internally.
That is why choosing the right routing approach matters a lot.
Brief History of React Navigation
For many years, React Navigation was the standard navigation library in React Native.
Almost every React Native project used it.
Developers manually created:
- Stack navigators
- Bottom tabs
- Drawer navigation
- Nested navigators
Example:
const Stack = createNativeStackNavigator();

export default function App() {
  return (
    <Stack.Navigator>
      <Stack.Screen name="Home" component={HomeScreen} />
      <Stack.Screen name="Profile" component={ProfileScreen} />
    </Stack.Navigator>
  );
}
This worked very well.
But as apps became larger, developers started facing problems.
Problems Developers Faced with Traditional Navigation
The biggest issue was boilerplate.
Developers had to manually:
- Register every screen
- Configure nested navigators
- Manage route names
- Handle deep linking manually
- Organize navigation logic separately
Small apps were manageable.
Large apps became difficult.
A common structure looked like this:
navigation/
 ├── AppNavigator.tsx
 ├── AuthNavigator.tsx
 ├── TabNavigator.tsx
 └── RootNavigator.tsx
Over time these files became massive.
Sometimes thousands of lines long.
New developers entering the project became confused quickly.
Why Expo Router Was Introduced
Expo Router was introduced to simplify navigation architecture.
Instead of manually registering screens, Expo Router uses file-based routing.
This idea became popular from web frameworks like Next.js.
The concept is simple:
Your folder structure becomes your navigation structure.
Instead of writing huge navigation configuration files, developers create screens directly inside folders.
Example:
app/
 ├── index.tsx
 ├── profile.tsx
 └── settings.tsx
Automatically becomes:
/            → Home
/profile     → Profile
/settings    → Settings
This dramatically reduces boilerplate.
Expo Router Is Still Using React Navigation Internally
This is one important thing many beginners misunderstand.
Expo Router is not replacing React Navigation completely.
Internally, Expo Router still uses React Navigation.
You can think of Expo Router as:
A smarter layer built on top of React Navigation.
So all the powerful navigation capabilities still exist underneath.
Expo Router mainly improves:
- Developer workflow
- File organization
- Route management
- Scalability
File-Based Routing Explained Simply
File-based routing means:
Folders and files automatically become screens and routes.
Example:
app/
 ├── login.tsx
 ├── dashboard.tsx
 └── profile.tsx
This automatically creates routes.
No manual registration needed.
This feels very natural.
Especially for beginners.
Traditional Navigation vs File-Based Routing
Traditional setup:
Screen File
    ↓
Manually Register Screen
    ↓
Add to Navigator
    ↓
Configure Navigation Logic
Expo Router setup:
Create File
    ↓
Route Automatically Exists
This is why many developers love Expo Router.
Less configuration. Less boilerplate. Cleaner mental model.
Nested Layouts in Expo Router
One of the best features of Expo Router is layouts.
Example structure:
app/
 ├── (tabs)/
 │    ├── home.tsx
 │    ├── profile.tsx
 │    └── settings.tsx
 │
 └── _layout.tsx
The _layout.tsx file controls shared navigation UI.
This means:
- Shared tab bars
- Shared headers
- Shared authentication checks
- Shared transitions
can all be managed in one place.
This becomes extremely useful in large apps.
Shared Layouts Explained in Simple Terms
Imagine a dashboard app.
Every screen needs:
- Same sidebar
- Same header
- Same tab navigation
Without layouts, developers repeat UI everywhere.
With shared layouts:
Layout
 ├── Header
 ├── Sidebar
 └── Current Screen
Everything stays centralized.
This improves maintainability a lot.
Protected Routes and Authentication Flows
Authentication becomes cleaner in Expo Router.
Example:
app/
 ├── (public)/
 │    ├── login.tsx
 │    └── register.tsx
 │
 ├── (protected)/
 │    ├── home.tsx
 │    └── profile.tsx
Now the app can easily check:
Is User Logged In?
 ├── Yes → Protected Routes
 └── No → Public Routes
This structure feels very natural.
Especially in production apps.
Developer Experience (DX) Comparison
This is where Expo Router becomes very strong.
React Navigation gives more manual control.
Expo Router gives better developer experience.
React Navigation workflow:
- Create screen
- Register screen
- Add navigator
- Configure linking
- Configure nesting
Expo Router workflow:
- Create file
- Done
For beginners, Expo Router usually feels much easier.
Performance Comparison
Many developers think Expo Router is slower.
Actually, both are very similar in performance because Expo Router uses React Navigation internally.
Still, there are small differences in workflow and behavior.
Bundle Behavior
React Navigation gives more manual control over bundle organization.
Expo Router automatically manages routes based on files.
For most apps, performance difference is very small.
In production, app architecture matters far more than the routing library itself.
Navigation Transitions
Both support:
- Native stack transitions
- Shared animations
- Gesture navigation
- Deep linking
Because internally both rely heavily on React Navigation systems.
Scalability Comparison for Large Applications
This is where things become interesting.
React Navigation scales very well technically.
But navigation configuration files can become messy.
Expo Router scales better from an organizational perspective.
Especially for teams.
Example:
app/
 ├── admin/
 ├── dashboard/
 ├── auth/
 ├── chat/
 └── settings/
This structure is easier to understand quickly.
New developers onboard faster.
Real-World App Folder Structure Example
A scalable Expo Router structure may look like this:
app/
 ├── (public)/
 │    ├── login.tsx
 │    └── register.tsx
 │
 ├── (tabs)/
 │    ├── home/
 │    ├── chat/
 │    ├── notifications/
 │    └── profile/
 │
 ├── admin/
 ├── settings/
 ├── modal/
 └── _layout.tsx
This feels very clean compared to massive navigator configuration files.
Which Approach Do Companies Prefer?
Honestly, both are used in production.
Many companies still use React Navigation directly.
Especially older enterprise apps.
Newer Expo-based projects often prefer Expo Router.
Because:
- Faster development
- Better organization
- Cleaner mental model
- Easier onboarding
But large companies still choose based on team needs.
Not trends.
When NOT to Use Expo Router
Expo Router is not perfect for every situation.
Situations where React Navigation may still make more sense:
- Highly custom navigation systems
- Existing large React Navigation projects
- Very advanced navigation control
- Teams already deeply invested in React Navigation
- Non-Expo environments with custom setups
Expo Router simplifies many things.
But abstraction sometimes reduces flexibility.
When React Navigation Still Makes More Sense
React Navigation is still excellent when:
- You want full manual control
- Your navigation logic is extremely custom
- Your app already uses React Navigation heavily
- Your team prefers explicit navigation setup
Some senior developers still prefer React Navigation because they like controlling everything manually.
Beginner Perspective
For beginners:
Expo Router usually feels easier.
Because:
- Less boilerplate
- Easier mental model
- Simpler folder structure
- Faster setup
You focus more on building screens instead of configuring navigation systems.
Enterprise Perspective
Large companies care about:
- Maintainability
- Team onboarding
- Scalability
- Developer productivity
Expo Router improves these areas significantly.
Especially for modern teams building large Expo applications.
The Most Important Thing to Understand
This is the key takeaway:
Expo Router and React Navigation are not enemies.
Expo Router is built on top of React Navigation.
You are still learning the same navigation ecosystem underneath.
The difference is mostly:
- Developer workflow
- Mental model
- Folder organization
- Boilerplate reduction
Final Thoughts
In 2026, both Expo Router and React Navigation are powerful solutions.
React Navigation gives maximum flexibility.
Expo Router gives better simplicity and organization.
If you are building:
- Modern Expo apps
- Large scalable apps
- Team-based projects
- Dashboard-style applications
then Expo Router is usually a very good choice.
If you need:
- Deep customization
- Advanced manual control
- Existing enterprise compatibility
then React Navigation still makes perfect sense.
At the end of the day, navigation is not just about moving between screens.
It is about structuring your application properly.
And honestly, good navigation architecture makes a huge difference once apps start growing.